How to manage config?
How to manage config?
Manage config is usually set up by the system administrator when it is implemented. It can be access by the administrator to make minor changes during the course of operation.
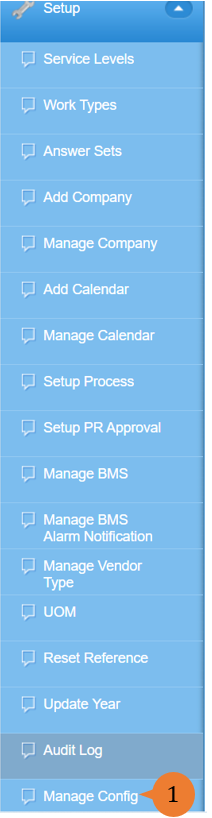
To manage config
- Select Manage Config under Setup from the Menu.
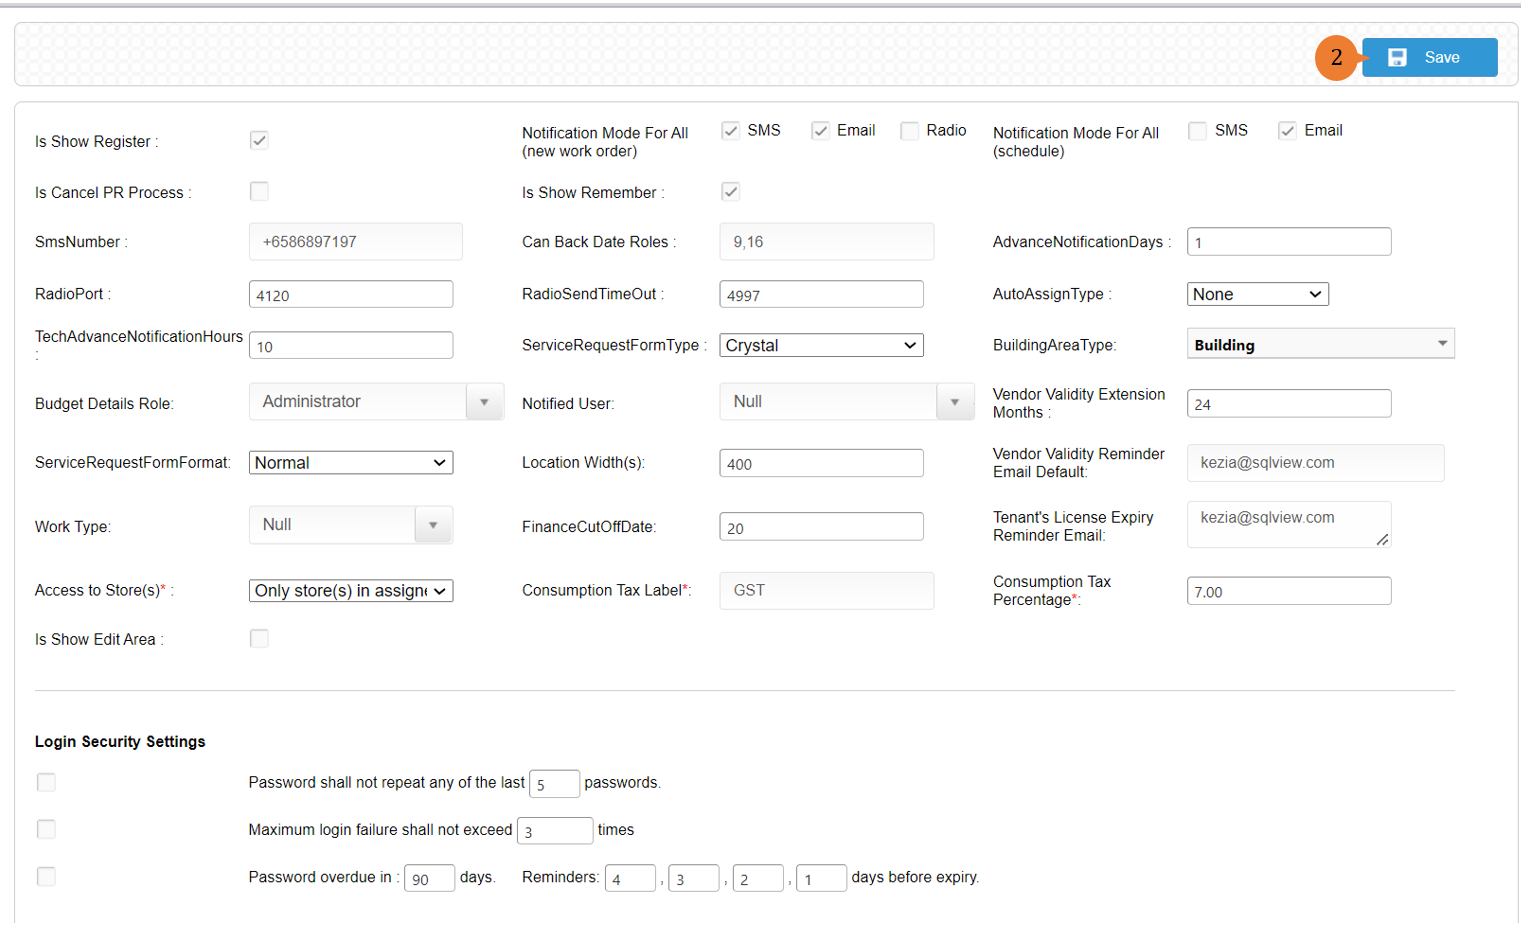
- Click on the Save button. Here is the explanation of the fields:
- Show Register – To display the ‘Registered a new user’ on the login page. It is used for account creation which is by default turned off.
- Notification Mode For All (New Work Order) – Set the default notification mode to notify relevant users when there is a new work order.
- Notification Mode For All (Schedule) – Set the default notification mode to notify relevant users when there is a schedule.
- Is Cancel PR Process – Defines whether there is an approval process for PR cancellation.
- Is Show Remember – To display the Remember me on the login page.
- SmsNumber – To configure the registered SIM Card Number that Buildfolio uses to send out SMS messages. This will be configured if you choose to purchase the SMS gateway.
- Can Back Date Roles – Define the roles that can edit the Actual Start Date/Time in a work order under the Work tab. Usually given to Supervisor and Work Manager role.
- AdvanceNotificationDays – Define the number of days Buildfolio sends reminders to Supervisors for scheduled work orders.
- RadioPort – Define the address of the radio transmitter that Buildfolio sends messages to.
- RadioSendTimeOut – Define the time in milliseconds that timeout will occur when Buildfolio tries to send out a message to a radio transmitter.
- AutoAssignType – Define how Buildfolio will automatically assign work orders to Sign-On technician(s): by Loop or Normal. It will be used for shift work.
- TechAdvanceNotificationHours – Defines the number of hours Buildfolio sends reminders to Technicians for scheduled work orders.
- ServiceRequestFormType – Defines whether the Service Request Form should appear in HTML or Crystal format.
- BuildingAreaType: Defines the building area type where the Budget is to be created.
- Budget Details Role – Defines the role that can see the budget details when creating a PR.
- Notified User – Defines the role that will be notified when work orders are created.
- Vendor Validity Extension Months – Define the number of months in which a Vendor is considered valid upon the date of approval.
- ServiceRequestFormFormat – Selects the option of format. Usually will be Normal unless you request for a customised report.
- Location Width(s) – Defines the width of the Location display box.
- Vendor Validity Reminder Email Default – The default email address to send reminders for Vendor Validity expiry.
- Work Type – To set the default value for Work Type in Create New Work Order and Edit Work Request.
- FinanceCutOffDate – This is for the billing module where you can configure the cut off date so it will reflect nicely in the billing report.
- Tenant’s License Expiry Reminder Email – The default email address to send reminders for Tenant’s License expiry.
- Access to Store(s) – Store access is given to the users. This is only applicable to users with the Inventory module.
- Consumption Tax Label – This is to configure the tax label for the relevant country (e.g. for Singapore will be GST).
- Consumption Tax Percentage – This is to configure the tax percentage so that it will be used for the Work Order Cost calculation.
- Login Security Settings – This is to configure the password security level.
- Mobile App – This is to configure the mobile app display for the tenant and all other users.
- Hoiio Set – Settings are required to set up the Hoiio messaging notification system. Only for users with SMS gateway purchases.
- Mobility Set – Set default values for CIFM Mobility’s Manage Today’s Aircon. Only applicable to users with Billing Module.
More on this topic 
- For step-by-step guides to using the Setup, see Set Up.